Tuesday, April 16, 2013

Favorite Foods... so far

Getting settled into married life means getting use to living together and EATING together. We have similar taste buds, but never seem to crave the same thing at the same time. However, we both do agree that we want to cook meals at home and not waste money eating out!
 
BREAKFAST
 
Tyler leaves before 7am most mornings, so we end up doing breakfast separately. I typically go for a long walk with my sister and our dogs, then return home to make a yummy meal. Tyler is more of a cereal guy, but most mornings I think his breakfast consist of sunflower seeds!
 
 
My favorite breakfast meal so far is an egg patty sandwich. Ty bought a very cool frying pan that is literally the size of a perfect egg patty. I scramble one egg and 1/2 a tablespoon of milk in a bowl with a mini whisk. Then I pour the mixture into the medium-high heated pan, that I spray with PAM before heating. I let the patty form, making sure most of the mixture is in solid form before flipping it, using a mini spatula I found at the dollar store. I cover the {new} patty top with a slice of the Ultra Thin cheese by sargento (usually a cheddar or colby jack). Once the cheese has melted, I lift the patty out of the pan and onto a Thin Sandwich (like the thin bagels). Whole Grain! I usually eat the egg patty sandwich with applesauce or greek yogurt... and of course a huge Tervis of coffee! 


DINNER
 
Our dinner routine is unique but it works for us. Tyler usually beats me home by at least an hour so he is able to do most of the cooking. Which he loves! He is a very good cook, takes after his momma! I just always feel bad that he waits on me to eat... we typically do not get to eat dinner until after 8pm.
 
You'll want...
Skillet and oil and medium heat- ready to go.
Oven at 375 degrees- ready to go.
13x9 sprayed with PAM- ready to go.
Boil noodles of choice!
 
Our favorite meal so far is Chicken Parmesan. Mostly, I love it because we both cook it together! Ty is not a huge fan of cooking meat in a skillet but I don't mind the popping oil bubbles... just wear long sleeves :). In order to have the best flavor, Tyler prepares the chicken the night before. He starts by cutting off the fat (of thawed chicken breasts) and then flattening the boneless chicken breast with a meat tenderizer. Then he pokes holes in the breasts and covers them with Italian dressing, inside of our Tupperware marinating container. We leave the breasts over night to marinate. The night of cooking, we take two "mixing" bowls... one with 3 eggs (Scrambled) and one with Italian bread crumbs... and we dip each breast in the egg (coat it) then roll it in the bread crumbs and then repeat. I let our skillet & oil reach medium heat and then take each breast (one at a time works easiest) and cook it in the skillet about 3minutes each side. Once both sides of the breaded chicken breast have that golden brown look, we place the breast into a 13x9.
 
{Here are the breast ready to now be baked}

 
In the 13x9 I place the breast in first. Then I add "spaghetti sauce" around the breast. It doesn't need to be under the breast, because it will move around once it starts baking. However, I do make sure to cover all of the edges of the pan and in between the two breast. I do not put sauce on top of the breast, but you could if you wished! {We use our own homemade sauce, but store bought works just fine!} I bake the chicken at 375 degrees for 30mintues. At the end of 30mintues, I pull out the tray in the oven and add cheese on top of the breast. Then I bake the dish for another 10minutes, changing the temperature to 350 degrees.
 
{Here is what the chicken looks like fresh out of the oven}
 
To serve, I put a breast on top of noodles (any kind... we have tried it all!) and add the sauce from the pan to my plate. The taste of the Italian chicken topped with cheese and sauce is amazing! Truly! We have had it every week since marriage, except for the honeymoon! Thanks to Momma Morenus for the recipe!
 
{Ready to eat...}
 
In honor of the food post... The picture of the day won't be of buddy bear... We will share a photo of our first ever dinner guests, our Atkinson family. They joined us the weekend after the honeymoon for hamburgers. It was very interesting- tyler used his new grill for the first time and we quickly figured out the burner covers (??) were flipped the wrong way so the flames had NO control and it looked like a giant fire! The kids told on the men, ty and colt, for their fire hazards but luckily colt was able to save the grill, the house and the food :}. Here are the adorable kids...


 "So, whether you eat or drink, or whatever you do, do all to the glory of God." 1 Corinthians 10:31


Thursday, April 11, 2013

Mr. & Mrs. Tyler Jay Morenus

I feel like we are OFFICALLY married now because of two things...
1. Legally, according to the social security office, I am Mrs. Brittany Wright Morenus
 
and
 
2. OUR WEDDING PHOTOS ARE READY TO BE VIEWED!
 
Side note to all of my friends who have recently wed or are planning to get married in the near future. Before the wedding, you need to visit the court house and get your marriage certificate from the register of deeds! At the wedding, your pastor/officiant and two witnesses will sign the certificate. THEN you get to take it with you EVERYWHERE, like it is a billion dollar bill, and change your name! Start at the social security office... take your I.D. (license and current social security card) and the marriage license AND complete the application (which can be found online). It takes 2 weeks for them to then mail you a new social security card with your new name (same number) and I highly suggest waiting on that card to arrive before you go to the dmv, among the other thousand places!!
 
Here is a list of places you should change your name:
 
Social Security, DMV, Bank (Account, Credit card, Checks), Post Office, Student Loans, Mortgage, Vehicle Title, Voter Registration, Insurance (Life, Health, Auto, Home), Utility Companies, Work (HR, Payroll...), LinkedIn, Social Media (Facebook, Instagram, Twitter, etc.), Doctor Offices, Vet Office........... I am sure you'll think of more, and if so, comment & tell me!! :}
 
PHOTOS :}...
 
Visit our photographer's site for a sample of our wedding photos...
http://www.angela-tucker.com/2013/04/08/brittany-tyler-just-married/
 
Visit this site to view ALL OF OUR WEDDING PHOTOS
using a username and password provided...

Click the link, then copy & paste the username/password and then my email (when prompted)!
http://www.enjoyphotos.com/
username: Brittany & Tyler Wedding
password: 30686-Love
email: thirtyone.brittanywright@yahoo.com


THANKS FOR READING!
 
"Therefore what God has joined together, let no one separate." Mark 10:9


Tuesday, April 9, 2013

Happy {Belated} Easter

HAPPY {Belated} EASTER!
 
 
I hope that you all enjoyed your Easter and had a chance to thank God for all the many blessings he has provided us with! I am so glad that He has Risen!
 
Being that it was mine and Tyler's first {holiday, specifically} Easter in our new house I decided we HAD to decorate and that I wouldn't spend money buying too many things.
 
Here is what I made...
 
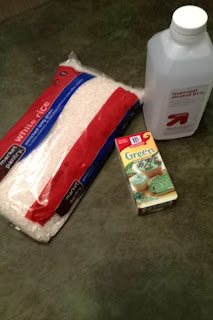
Using the following supplies:
Rice
Green Food Coloring
Rubbing Alcohol
Zip Lock bag
Throw-away plate

 
I put all of the rice into a gallon size zip lock bag. {I highly recommend a bag with the slider closure so you REALLY know it is closed- especially if you let kids help! Then I added a cap full of rubbing alcohol (literally filled the cap of the rubbing alcohol container and dumped it onto the rice). Then added a few squirts of green food coloring.. start with 3-5 squirts, then add more if you feel the color isn't spreading enough. Close the bag and then spread the color onto the rice by moving the rice in your hands (hands outside of the bag :)) and shaking the bag, etc. It takes no time to do so! Then pour the green rice onto a throw-away plate... it took 2 plates for me. It doesnt have to be a flat layer, but you do want it to be thin enough that the rice will dry! I let it dry for a few hours while I did other things, but once you touch the rice and feel it is dry its ready to use!

 
While the rice dried... I painted letters...
 
 
Can you figure out what these letters will spell?
E A S T E R
 
Here is my little helper for the day... adorable!
 
Once the letters and rice dried.. I added the rice to the bottom of mason jars (pint size) to look like grass and put a letter in each jar. Then I ordered the jars on my mantle to spell out EASTER!
 
{Bad Photo}
 
To finish the mantle... I cut easter fabric ($1 for 1/2yard at Handcock Fabric) into a 4x6 and literally put it inside a frame that was already on my mantle. I left the photo in the frame so I wouldnt have to hunt it down after Easter! {Left of EASTER mason jars, sorry you can't really see it}. Then I dug out an old bunny rabit I had in my "Childhood" rubbermaid container in my garage. Luckily, the painting I have on my mantle already matched- so I left it! Here is our very first EASTER mantle :)...
 
 
Now.. if you had visited during the holiday, you would have been greeted at the front door by this $5 AC Moore find...
 
And you could have joined us for our annual egg dying fun... this photo is taken from dying eggs with our Atkinson girls. However, we ended up participating in four different egg dying sessions! :)
 
Last but not least...
Tyler and I started an Easter tradition. We went to Dollar Tree {his favorite} and picked out easter baskets... a chicken on his {he has pet chickens} and fun decorative eggs on mine. This step is complete for future Easters but the following will be repeated... We each picked out several packages of candy that we wanted, paid for it all, then went home and assembled the other person's Easter basket! They stayed on our kitchen bar counter so we could snack on our treats during the Easter season! WAY TOO MUCH CANDY!! :))
 
 
THANKS FOR READING!
 
John 11:25-26Jesus said to her, "I am the resurrection and the life. He who believes in me will live, even though he dies; and whoever lives and believes in me will never die.